Conversationalish Feedback via Screencasts

What?
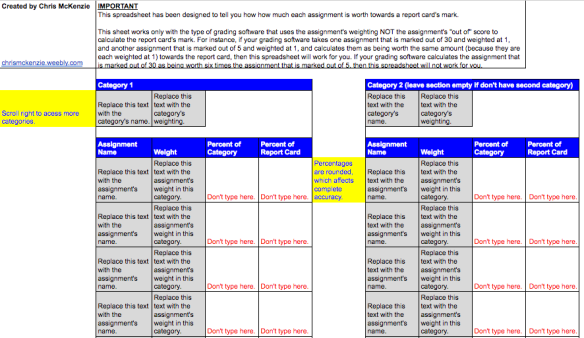
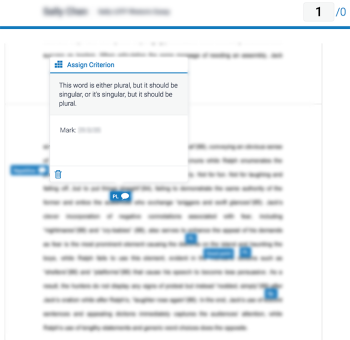
This post is about something new I’ve been trying in the past couple of months: providing feedback for my students’ essays via links to screencasts. I make a recording of the essay on my screen and record my voice and mouse cursor as I go through each portion. I call it, “conversationalish” because it’s a one-sided conversation, rather than a full conversation. See the video below for an example that I made up.

It would be easy to do this for any type of digitally-submitted assessment, and I will be trying it out with other types of assessment soon.


Why?
I realized that students who come to me to discuss their feedback are doing so because conversations can give much more information that written feedback. Ideally, I would converse with each student about everything they do, but that’s not possible, so I decided to try for to get some of the benefits through a one-sided conversation.

Screencasting the comments allows me to differentiate their feedback, too. Before each assessment that the students submit, I ask them to indicate on the assessment whether they would like video feedback or written feedback. This way the each student receives the type of feedback that she finds more useful.

My Impressions
My feedback is more thorough because I can explain a specific point of feedback in a way and level of detail that that an individual student requires.

I’m giving a lot more positive feedback mixed in with portions that the students need to strengthen. This surprised me, but I think it’s because the “conversation” makes the process seem more human.

Marking is faster than it is when it’s written because the process of speaking through a point is faster than it is when writing a point. This does depend on two things, though: 1) that I have settled into an efficient workflow (see below), and 2) that I’m not normally just writing something like “awkward,” but I often explain what is awkward and suggests strategies that could improve the awkwardness.

Students’ Impressions
Approximately two-thirds of my students have requested video feedback, and one-third have requested written feedback.

Based on the results of an anonymous survey, I have found the following benefits to screencast feedback:

  • It’s more like a personal conversation and is less intimidating.
  • The feedback is clearer and more focused.
  • It’s more engaging.
  • Using the mouse cursor let them visualize the feedback, which is tougher with static text.

And the following detriments:

  • It’s more difficult to go back and review feedback that is spoken in a video, rather than written.
  • It doesn’t suit every student’s learning style (which is why I now offer a choice).

It would be good to address the difficulty of going back and reviewing the feedback. I’ll have to figure that out somehow. I do write an overall comment of strengths and things to strengthen at the end of the essay so that it’s easier to review the larger points, but it doesn’t provide the specific details.

My Workflow

  • Open up my screencasting software. I use Camtasia, but there are others, even QuickTime.
  • Bring up the student’s assessment on the screen.
  • On a piece of paper, write down notes about things I would like to mention from the first paragraph or two. (e.g. “specific, engaging thesis statement”, “misplaced modifier with ‘reading a book’”)
  • Use the screencasting software to record as I discuss the first paragraph or two. My notes guide me. I also like to mention what I’m hoping to see as I continue reading (e.g. “This makes me think you are going in an direction with your analysis, so I’m going to now look to see if you fully explain it in the next portion.”)
  • Repeat with the next portion of the assessment until it’s complete. Annotate the video so that the mark is written near the end or just speak the mark into the video.
  • Write an overall comment of strengths and things to strengthen at the end of the assignment.
  • Upload the video to Google Drive and share the link with the student.

This is all a work in process, but it’s something that looks to hold a lot of potential.

A Spreadsheet to Calculate How Much Each Assignment is Worth towards a Report Card

About ten years ago, my school had grade book software that would state what percentage each assignment was worth towards a report card’s mark. I could see that assignment X was worth 21.9% of the first report card, and at the end of the year it was worth 8.9% of the final mark. Our newer grade book software doesn’t have this feature, which is a shame because I find it valuable to know that information so that I don’t accidentally overweigh or under-weigh something, so I made a spreadsheet to calculate this information for me. (link)

This sheet works only with the type of grading software that uses the assignment’s weighting NOT the assignment’s “out of” score to calculate the report card’s mark. For instance, if your grading software takes one assignment that is marked out of 30 and weighted at 1, and another assignment that is marked out of 5 and weighted at 1, and calculates them as being worth the same amount (because they are each weighted at 1) towards the report card, then this spreadsheet will work for you. If your grading software calculates the assignment that is marked out of 30 as being worth six times the assignment that is marked out of 5, then this spreadsheet will not work for you.

Feel free to make a copy of this template if you find it useful, but please keep my name and site at the top-left.

mark-towards-report-card

2 Tips for Feedback on Turnitin

I have a small backlog of ideas that I’ve been meaning to write about, but I haven’t found the time to write about them properly, which wouldn’t help me or anybody who happened to wander by and look at them. However, it’s been a long time, so I thought I’d do a short post about two tips I’ve discovered for providing feedback on Turnitin. Turnitin is known as an anti-plagiarism tool, but I find it even more useful as a method of giving my students feedback. Keep in mind my context, which is that I’m teaching in a secondary school (high school to Americans).

1. Hide the Mark in a Comment

Some students read their comments, and some look for a mark and are done after that. By hiding the mark in one of the comments, there is a better chance they will have to look at a few comments before they see their grade. In the grade box at the top of the essay, I type a “1” to indicate to me that I’ve marked the essay. I don’t put their mark in it.

mark-in-comment

2. Make the “Post Date” Time for Outside of School Hours

When students receive their marks during school hours, they often feel pressured to tell their friends their marks, and then the comparisons begin. By making the time of the “Post Date” occur outside of school hours, the students are removed from the immediate pressure to share their marks.

release-time

What I Learned at NCCE, 2016

View from the Washington State Conference CenterAt the end of February, 2016, I was fortunate enough to go to the Northwest Council for Computer Education (NCCE) conference in Seattle. I’ve become a bit soured on conferences lately, but I wanted to work on my presentation skills, so I applied to present, was accepted, and decided to attend this one.

To my surprise, it ended up being one of the most useful conferences I’ve ever attended. My presentation went well, and I now have some things I know I can work on. The networking was good, as always at these things. And, I attended many very good sessions that gave me information that is usable immediately and in the future.

I have pages of notes that I took. However, in this post, I will highlight a few of the things I learned that I thought were especially useful.

Aerial Photography / Videography

Presenter: Joe Dockery

  1. All of the information from this session can be found here. There’s a lot in here, so if you are interested in quadcopters being used for education, this is a great page to get you started.
  2. If you want to gain acceptance for the use of quadcopters in your school, call them “quadcopters”, not “drones”. The connotations associated with the word “drone” may turn people off.
  3. Before letting the students use quadcopters, make the students go through a training program with videos, a manual, hands-on practice, and an exam. At the end, give them a “license” from the school to fly quadcopters. Make them reapply each year.

From Textbooks to Playlists: The Rise of Multimodal Learning

Presenter: Laurie Burruss

  1. The presentation slides can be found here.
  2. We’ve had hundreds of years to perfect the essay. We haven’t had long at all to perfect the video essay. Work needs to be done.
  3. At Dartmouth, half of the English 101 courses are now requiring a video essay / multi-modal essay because the regular essay were getting to be too formulaic. The video essays have a five minute time limit. Then, the students write an essay about the same topic as their video essay. What the university has found is that the written essays are then of a higher quality because the students have to really understand and digest the content in the multi-modal form first.
  4. Good videos are not selfie videos. They are about the topic of the video and focus the filming on that, not the student.

Presentations by Leslie Fisher

Presenter: Leslie Fisher

  1. Snapmap for Instagram will map out the last 20 geotagged photos for a public account. My own thought is that students could use this to see if their photos show up. If the photos do show up, students could be asked if someone could follow the account for a time and find out where they live, where they like to go, if their family is out of the house for an extended time, and if the student is home alone.
  2. I learned a new way of using Kahoot: selfie Kahoots. A selfie Kahoot can be used as an icebreaker or as a way to learn more about people. One question could be about a student or teacher and be set up like three truths and a lie. Others would have to correctly guess the lie. Or, a statement could be made, and the answers each have a different person’s name. Then, others have to guess which person matches the statement.

You’re So Distracted You Probably (Don’t) Think This Presentation is About You

Presenter: Jason Neiffer

  1. The presentation slides can be found here. 
  2. Simplify online learning environments as much as possible. If there is too much clutter on the screen, it gets confusing and distracting for students.
  3. Some tips and solutions for everyone:
    1. Use technology’s granular controls to battle distraction. For example, turn off notifications on not only your mobile devices but also your laptops and desktops.
    2. Be mindful of the physical location of your technology. Don’t sleep with it next to you, and stack your phones when having dinner or in other face-to-face environments when you should be focussing on those around you.
    3. Invite students to help create (re-create) and reinforce community norms.
    4. Experiment with what works for you. Analyze the results. Change what you are doing. Repeat this process until you find what works.
  4. Avoid banning phones. Students need to develop these skills and cannot do that if the phones are not with them.

How My Students Used Math to Analyze Poetry

Sometimes my students really amaze me.

One of the things I love about teaching English is that I’m frequently learning new things from my students. Even my grade 8s have had wonderful insights that I’d never considered before.

Earlier this week, my class read “Dulce et Decorum Est. After reading it for comprehension, they formed small groups and chose the poem’s words and short phrases they thought were particularly powerful. Writing on the board and windows, the groups listed the words in the order they appear in the poem. Then, using their lists, they identified patterns and progressions to help deepen their analysis and understanding.

As we went around to each group’s work, I was impressed, as always, at my students’ insights. However, one group, in particular, stood out because they used math to help them with their analysis. They numbered each word from 1 to 12, from the most powerful to the least powerful word in their list. After ranking the words, they found the average rank for each stanza in the poem: the lower the average, the more powerful the words in that stanza. Their result is shown in the photograph below.

math poetry 2

By finding the averages, they identified that the words become more powerful in each new stanza, and this led to a discussion about why this was so.

Now, of course, their rankings were subjective, but it was still a unique method of approaching analysis, and it spurred an insightful discussion of the poem.

I can’t wait to see what my students teach me next.

Google Cardboard For Android: Educational Apps That I’m Exploring

Intro
This summer, I’ve been exploring Google Cardboard’s usefulness for education. I’ll state upfront that I haven’t tested out these apps with my students or other teachers yet, but these are the apps that have grabbed my attention at the moment. Cardboard is still in its infancy, so one of the themes in this post is potential. Cardboard holds a lot of potential even if there aren’t too many uses that are directly applicable to education yet.

This video contains short clips from each of the apps. Scroll past the video to read my brief reviews.


Titans of Space for Cardboard
(Link to Google Play)

Space

I had fun with this one. The app makes it seem as though the user is flying through our solar system, going from planet to planet, and at each planet, it gives the user some information about what he is seeing. The distances aren’t to scale, and I’m not sure about the sizes because those seem off too, but the moons seem to be at the proper scale. With the free version, the first two stops in the galaxy come with voiced narration, but for more, an in-app purchase is necessary.

The content doesn’t seem to be too in-depth for higher grades, but it is a fun way of viewing the solar system. One concern I have is that I find I can’t use cardboard for more than five minutes or so without my eyes feeling strained, but this app requires more time than that to run all of the way, though. I would like to be able to choose which planets I fly to instead of having to start at the beginning each time.

Isaac3D 
(Link to Google Play)
(Link to Developers)

Orbital

I didn’t know too much about orbitals before I used this app, and, I won’t lie, I still don’t know a lot. But this app did teach me some new things. The user turns his head right to view written information with 3D models. At the end, there is an option to view different types of orbitals. Even though I don’t know much about this topic, I imagine the app would be useful for science teachers.

Anatomyou: 3D Human Anatomy
(Link to Google Play)

Ventricle

This app took me on a first-person journey through the left ventricle of the human heart. As I travelled through, I saw signs pointing to different features. Eventually, the app will include journeys through many different parts of the body, but for now it’s just the one.

Unfortunately, I didn’t think this app was that great. The ventricle all looked the same, and the app sped me by everything so quickly that I don’t actually get to look around and read the signs. There may be a way to control the navigation, but if there was, it wasn’t intuitive. The app is a good idea, but I think I’ll wait for it to be polished some more.

Exhibit
Mask
In the Cardboard app’s “demos” section, there is a demo called, “Exhibit”. In it it’s possible to look all around wooden carvings and masks by Rande Cook http://www.randecook.com/index.html . The work looked very much like West Coast First Nations’ art, so I looked up the artist, and sure enough, Rande Cook lives in Victoria on Vancouver Island. Cool! Some local talent shown off in one of Google’s apps. Congratulations!

War of Words VR (Sassoon, “The Kiss”)
(Link to Google Play)

War
This is a short, but effective animation to illustrate Sassoon’s poem, “The Kiss”. The ending is fairly violent, so you’ll need to think about the age and maturity level of your audience. Nonetheless, I think it’s quite a powerful presentation of the poem, and, again, holds a lot of potential for other, similar apps.

Slave Poet VR
(Link to Google Play)

Slave

I’m ashamed to say I’d never heard of George Moses Horton before. Since installing this app, I learned that he was the first published poet in the Southern U.S. and composed much of his poetry while he was a slave on a plantation. You can read the Wikipedia entry (https://en.wikipedia.org/wiki/George_Moses_Horton) for more information.

This app recreates the campus of the University of North Carolina at Chapel Hill, which is where Horton composed his early poetry. In the app, I walked around the university and, at various locations, come across pillars with books on them. When I approached each book, one of Horton’s poems popped up for me to read.

This a good app for an introduction to George Moses Horton, but it also opens the door for other potential apps that could situate information in some sort of context. Perhaps students could use Sketchup and 3Dmodelviewer to do this very thing.

3Dmodelviewer
(Link to Google Play)

Diorama
I’ve done a fuller write-up in my previous post here. It is possible to have students create small models and then allowing them or others to immerse themselves in them. I really like the idea of allowing the students to create, manipulate, and explore the content. I only wish that it were possible for them to do this easily in more ways than just making 3D models.

360 Video Channel (Neymar and Hyenas)
HyenaSoccer
The #360 Video Channel doesn’t have all of the VR videos I’ve seen on YouTube, but it has many of them. Predictably, most of the videos are not educational. Right now, they tend to be more exciting, daredevil-type films, with a good dose of suspense/horror videos. But I’ll be keeping an eye on this channel, and sometimes even non-educational videos could be useful, too.

Here are a couple I like: “Hyenas Wrestling with Kevin Richardson”, and “Nike Hypervenom II – The Neymar Jr. Effect, A Virtual Reality Experience”.

Photo Spheres
Squamish
Even though they are not 3D, photospheres look great when viewed through Cardboard. The device gets rid of other distractions, so it does feel more immersive.

It’s not difficult to find photospheres online, although getting other people’s to work with Cardboard may require a few steps. Students, too, could create photospheres let others view them as part of an assignment.

So, there you go. These are some educational apps to check out with Google Cardboard. Like I said, most of them are more about the potential of what may come and aren’t necessarily ready right now, but I’ll certainly be keeping an eye out for more.

How to Use Sketchup with Google Cardboard on Android

Update (Jan. 19, 2016): The app Kubity seems promising and easy to use; however, it requires users to upload their models to the Kubity site, so for those who don’t want to upload their work to someone else’s site, these instructions still seem to work best.

Near the end of this year, one of my students brought Google Cardboard to our English class. When class was over, a few students and I were trying it out. Cardboard had been on my to-try list for a while, and now, but after trying it out that day, I ordered it right away.

One of the first things I thought of doing was getting it to work with Sketchup. I also teach an ICT course, and my students use Sketchup to design 3D buildings and rooms. I suppose I could argue that there is some pedagogical value in having the students experience their work in a more realistic fashion, but who would I be kidding? I really only wanted to import Sketchup models into a virtual reality environment because it’d be cool and fun.

I came across 3d model viewer for cardboard. There is a bit of documentation with it, but I found that I still had to tinker around and figure some things out myself, so I thought I’d make a set of instructions to help out others.

The viewer isn’t perfect. At times, there are gaps in the models. At other times, the shapes themselves can be distorted. I also found that flat shapes tend to flicker and not show up well, if at all. You will also notice that the app flipped everything horizontally. I have come across a possible fix for this in the comments for the app, but it seems a bit annoying to do. I may try it out at some point, though. I’m still playing around with with the app, so I’ll update this post as I learn more or as the app updates and works even better.

You may have trouble using this app with large files. I found that a 50 mb file is about the largest that will load on my phone, and even that can be hit or miss. You’ll need to try out different file sizes of your own to see what you phone’s limit is.

I am running Sketchup Pro 2015 on a Mac. The app is 3d model viewer v .54, and it is running on a Nexus 5 running Lollipop.

Unfortunately, I am not an expert with the app or with Sketchup, so I may not be able to answer questions.

If anyone has any tips to make things work even better, please let me know.

Finally, I would like to thank the developer of 3d model viewer, Hedgefundapps.

Instructions

1. Download 3d model viewer for your Android phone.

2. Open Sketchup, and open or create a model. For the better results, try not to layer 2D shapes on top of each other. For instance, if you have a 2D carpet, it will not show up well if it is resting directly on the floor. In the sample model in the videos below, I had a floor drawn directly on top of a circular moat. In order for the floor to show, I had to give it a very slight bit of height to make it three dimensional instead of two dimensional.

3. In Sketchup, go to “File”, “Export”, and “3D model”. Make sure you are exporting an .obj file. Before you click, “Open”, or “Okay”, or whatever the button says, you need to do one more thing or else the textures won’t show up. You need to go to “Options”. (It may be called something else in different versions. I’m not sure.) Then make sure you check “Export two-sided faces”. Now most of your textures should show up fine. Go ahead and export the file.

Options

Two-sided faces

4. Now, go to the folder on your computer that contains the .obj file. In that folder you should see an .obj file, an .mtl file, and a folder with any textures (in .png and .jpg formats) that may be associated with the model. The .skp files may or may not be there, depending on where you’ve exported your .obj to. I don’t think the .skp files are needed from now on, either.  It will look something like the image below.

File Structure 2

5. What you need to do now is move your .obj and .mtl files into the same folder as all of the texture files. Everything needs to be in one folder.

6. I’m not sure if everyone needs to do this step, but without it, my models would not show any texture. If your models do not show any texture, the developer says to do the following: “If textures aren’t loading check that the paths in the .mtl file contain no special characters.Try toggling the smoothing option.” However, I’ve found that a different step seems to work for me:

6a. Use a text editor to open the .mtl file.

6b. Look for any parts that say, “map_Kd” followed by the folder and texture name.

mtl file

6c. Because the .mtl file is in the same folder as the textures, I don’t think you need to have the folder name anymore. When I got rid of the folder names, the textures worked much better in the app. So, for instance, I changed the line from “map_Kd Castle3/Vegetation_Grass_Artificial_Yellow.png” to “map_Kd Vegetation_Grass_Artificial_Yellow”. Then, go through and change this whenever you see a “map_Kd” line. The find/replace function really helps here.

Revised mtl file

7. Now you need to upload the entire folder into the “3Dmodels” folder on your phone. I like using AirDroid to transfer files, but you can use whatever works for you. The image below shows what the folders now look like on my phone.

Files on Phone

8. On your phone, run “3d model viewer”, and put your phone into your Google Cardboard set.

9. To use the viewer, aim the crosshairs at the menu items, and let the crosshairs sit on the on-screen button for a second in order to select it. I like to turn off the backgrounds because I find them distracting. Then, move the crosshairs over the folder and then the file name to open the model. Sometimes the model can take a while to open.

10. When you are in the model, you can look at the feet to turn on walking, and you can look at them again to turn off walking. Or, you can use the magnet on the side of Google Cardboard to toggle walking on and off. In some places on the screen, you will see up and down arrows. Move the crosshairs over those to move your point-of-view up and down.

11. When you want to go to the menu, look down at your feet to see the “menu” button.

Videos for Comparison

I’ve created three videos so that you can see how a simple model I made looks in Sketchup and how it looks when run in the 3d model viewer program. I’ve also created a third video to show you what the “Diorama” mode looks like in the program. Keep in mind that even though the second and third videos show only 2D images, the model viewer does show your model in 3D when you look at it in Google Cardboard.

Have fun!

Recording of the Original Castle Model

3d model viewer on Android Phone

3d model viewer in Diorama Mode

Growing Up with A Makerspace

Maker spaces are all the rage now, and with good reason. But it was only last month that I realized I grew up with one.

When I was in elementary school our dining room had a large, rectangular, wooden table from the mid-60s. It was my dad’s table when he was a kid. In the middle of the table was a leaf that could swing up and make the table longer. However, the best thing about that table wasn’t that it had a leaf, nor was it that it was from my dad’s childhood. The best thing about it was that we rarely used it to eat on. Eating on it was reserved for special holidays and other family occasions. Instead, for the vast majority of the time, it was our crafts table. Or, if it were around today, I supposed it would be called a maker space.

It was usually covered with heaps of construction paper, cardboard, paper tubes, sparkles, scissors, glue, tape, marbles, ping-pong balls, cotton balls, paper clips, straws, and a miscellany of other items. My brother and I would turn these into all sorts of things, some created from our imaginations and some inspired by things we’d seen. We’d use marbles, tubes, paper, and straws to create Rube Goldberg machines. Or we’d cut out gears out of construction paper, cut holes in the centre, put in some paperclip axles, and pretend we had the workings of a clock. Anytime we’d need to give a family member a card for a special occasion, we’d go to the table and create one; often they were of the pop-up variety. Sometimes our creations worked, and sometimes we’d have to explain to people how they were supposed to have worked, but the failures never deterred us from making new things. If anything, they encouraged us to keep trying.

I like to think that our table had a lasting influence on me and my brother. He grew up to become an engineer, and while I’m not artistic in the traditional sense, I consider myself to be a creative thinker and problem-solver. I love tinkering with things, improvising tools, and making things work in ways that weren’t intended.

The craft table still exists at my mom’s house, but it is used once again for formal meals. I, however, still remember it fondly as my creative space.
No photo exists of the table covered in crafts, but in the spirit of this post, I’ve created a mini mockup of what it would have looked like.

Craft Table

What Happened When I Gave My Students Choice?

For the past couple of years, one of my teaching goals has been to give my students more choices about their learning while keeping the quality of learning high. This balance is not easy to achieve, so I’ve been making only a few changes each year. For instance, earlier this year, I wrote about bringing the EdCamp model to my classroom. I’ve since tried this with younger grades as well and have had the same positive outcomes.

Recently, I decided to take a risk and take an approach to teaching Hamlet that was much more student-centred than before. In the past, we’d read the play as a class, perform close analysis, and discuss the main ideas together. This year, we still read the play as a class and performed some close analysis together, but I left the big ideas up to them.

They were given five big ideas: being true to yourself, conflicting religious and societal codes, cowardice and rationality, metaphysics, and trust (and a lack of it). They signed up for the topic that interested them, formed groups, and had to track that topic through the play.

When we were close to finishing the play in class, the students had to create a list of all of the parts of the play that pertained to their topic. Then they had to analyze that data to come up with an insightful observation that they turned into a thesis. When they encountered points that refuted their thesis, they needed to adjust it to incorporate those points or come up with a new thesis if adjustments weren’t possible.

Once they developed their thesis, they needed to create a presentation that explained it. The presentation could be in any format they wanted as long as it could be embedded into our class page for others to see and interact with.

As we read the play, we rarely discussed their topics, so this was a lot of trust to place in the students. Would they achieve the same level of learning as students in previous years had? Would the insights that they came up with be as good as the insights I fed them?

It turned out that they had learned more than I could have taught them, and came up with much deeper insights than I could have fed them. They also said they’d remember what they learned for a longer time than if they wrote yet another essay. I do wish I space out other assessments a bit better for them, though, so that’s something I’ll need to work on next year.

They gave me permission to post some samples of their work.

So, what happened when I entrusted my students and gave them the freedom to choose and create? They learned more than I could have taught them on my own, came up with some very insightful observations, and created presentations they deserve to be proud of.