
Update (Jan. 19, 2016): The app Kubity seems promising and easy to use; however, it requires users to upload their models to the Kubity site, so for those who don’t want to upload their work to someone else’s site, these instructions still seem to work best.
Near the end of this year, one of my students brought Google Cardboard to our English class. When class was over, a few students and I were trying it out. Cardboard had been on my to-try list for a while, and now, but after trying it out that day, I ordered it right away.
One of the first things I thought of doing was getting it to work with Sketchup. I also teach an ICT course, and my students use Sketchup to design 3D buildings and rooms. I suppose I could argue that there is some pedagogical value in having the students experience their work in a more realistic fashion, but who would I be kidding? I really only wanted to import Sketchup models into a virtual reality environment because it’d be cool and fun.
I came across 3d model viewer for cardboard. There is a bit of documentation with it, but I found that I still had to tinker around and figure some things out myself, so I thought I’d make a set of instructions to help out others.
The viewer isn’t perfect. At times, there are gaps in the models. At other times, the shapes themselves can be distorted. I also found that flat shapes tend to flicker and not show up well, if at all. You will also notice that the app flipped everything horizontally. I have come across a possible fix for this in the comments for the app, but it seems a bit annoying to do. I may try it out at some point, though. I’m still playing around with with the app, so I’ll update this post as I learn more or as the app updates and works even better.
You may have trouble using this app with large files. I found that a 50 mb file is about the largest that will load on my phone, and even that can be hit or miss. You’ll need to try out different file sizes of your own to see what you phone’s limit is.
I am running Sketchup Pro 2015 on a Mac. The app is 3d model viewer v .54, and it is running on a Nexus 5 running Lollipop.
Unfortunately, I am not an expert with the app or with Sketchup, so I may not be able to answer questions.
If anyone has any tips to make things work even better, please let me know.
Finally, I would like to thank the developer of 3d model viewer, Hedgefundapps.
Instructions
1. Download 3d model viewer for your Android phone.
2. Open Sketchup, and open or create a model. For the better results, try not to layer 2D shapes on top of each other. For instance, if you have a 2D carpet, it will not show up well if it is resting directly on the floor. In the sample model in the videos below, I had a floor drawn directly on top of a circular moat. In order for the floor to show, I had to give it a very slight bit of height to make it three dimensional instead of two dimensional.
3. In Sketchup, go to “File”, “Export”, and “3D model”. Make sure you are exporting an .obj file. Before you click, “Open”, or “Okay”, or whatever the button says, you need to do one more thing or else the textures won’t show up. You need to go to “Options”. (It may be called something else in different versions. I’m not sure.) Then make sure you check “Export two-sided faces”. Now most of your textures should show up fine. Go ahead and export the file.


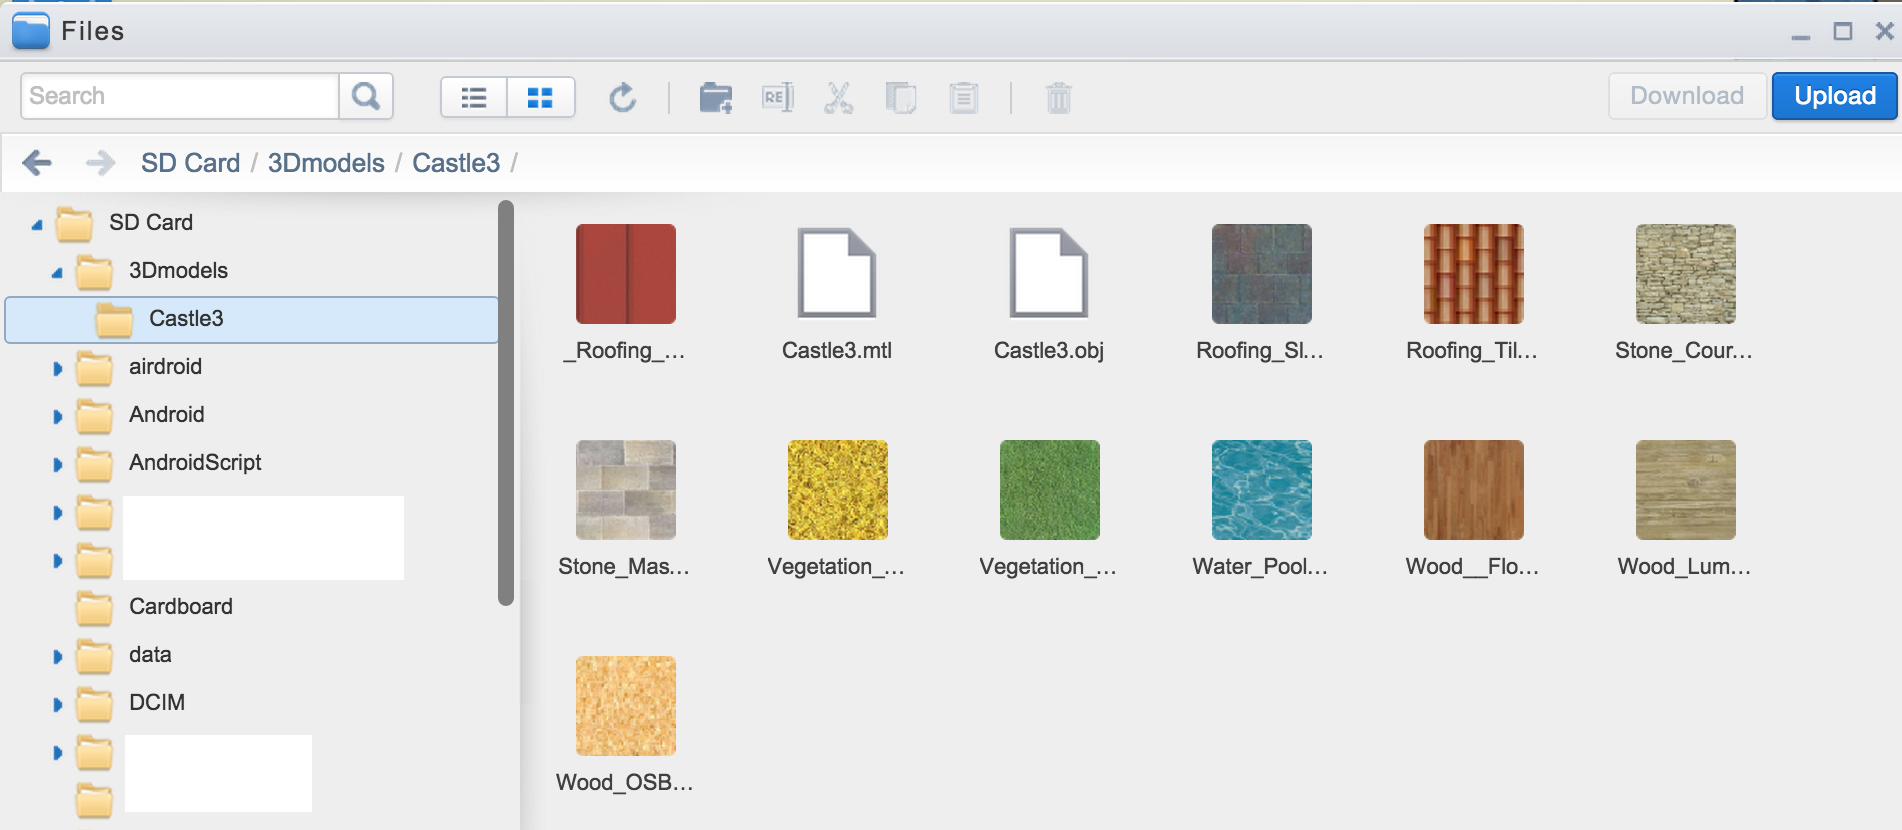
4. Now, go to the folder on your computer that contains the .obj file. In that folder you should see an .obj file, an .mtl file, and a folder with any textures (in .png and .jpg formats) that may be associated with the model. The .skp files may or may not be there, depending on where you’ve exported your .obj to. I don’t think the .skp files are needed from now on, either. It will look something like the image below.

5. What you need to do now is move your .obj and .mtl files into the same folder as all of the texture files. Everything needs to be in one folder.
6. I’m not sure if everyone needs to do this step, but without it, my models would not show any texture. If your models do not show any texture, the developer says to do the following: “If textures aren’t loading check that the paths in the .mtl file contain no special characters.Try toggling the smoothing option.” However, I’ve found that a different step seems to work for me:
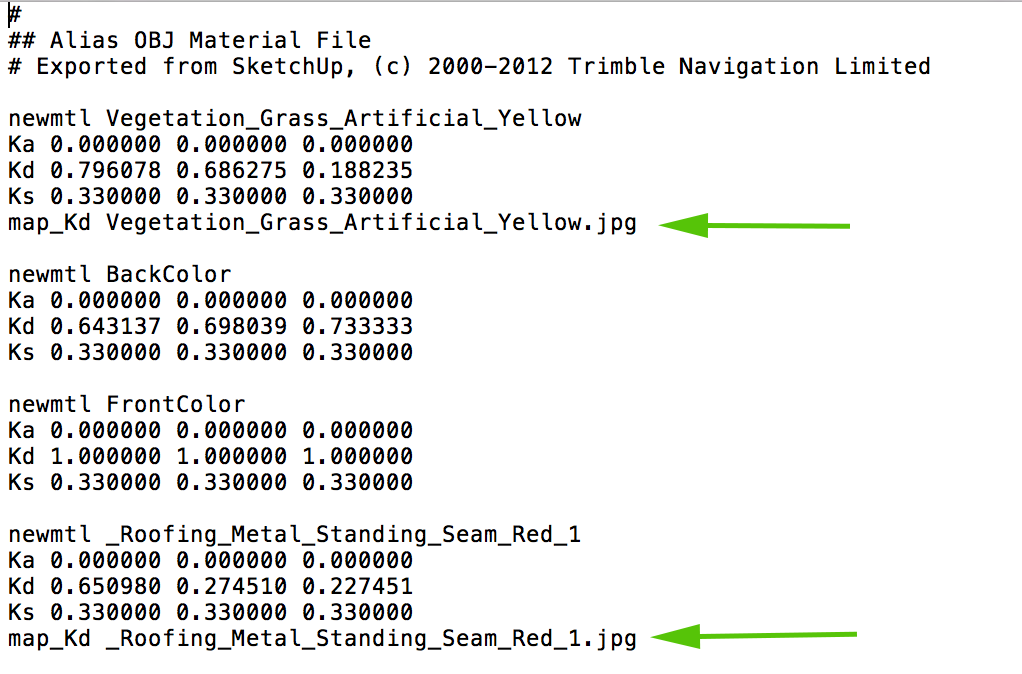
6a. Use a text editor to open the .mtl file.
6b. Look for any parts that say, “map_Kd” followed by the folder and texture name.
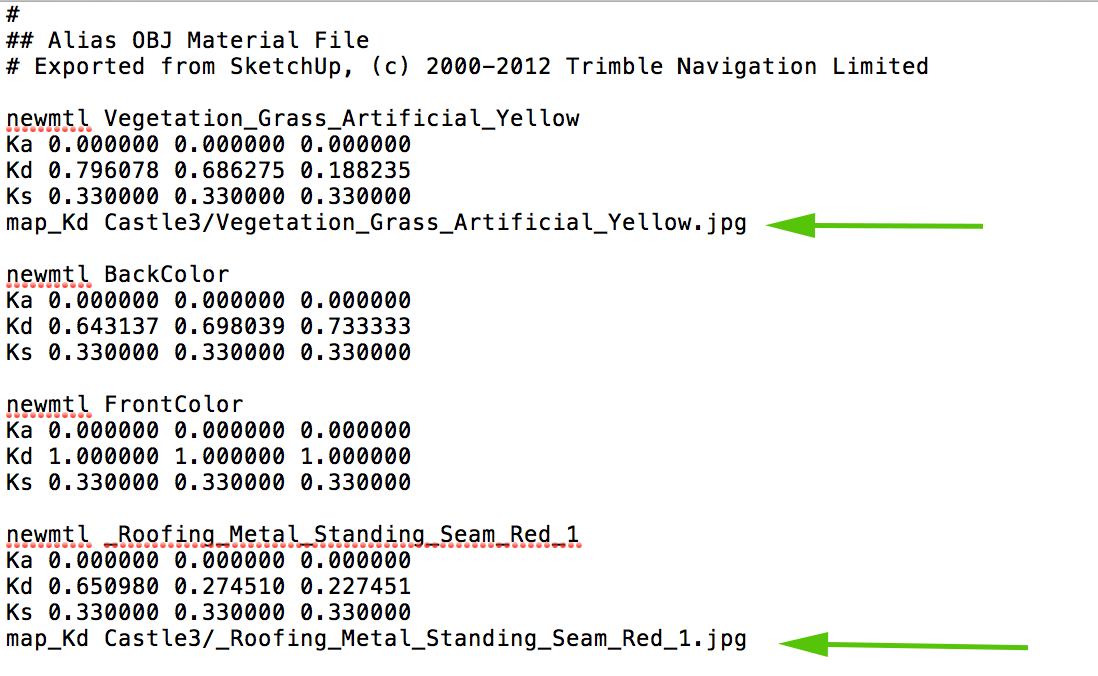
6c. Because the .mtl file is in the same folder as the textures, I don’t think you need to have the folder name anymore. When I got rid of the folder names, the textures worked much better in the app. So, for instance, I changed the line from “map_Kd Castle3/Vegetation_Grass_Artificial_Yellow.png” to “map_Kd Vegetation_Grass_Artificial_Yellow”. Then, go through and change this whenever you see a “map_Kd” line. The find/replace function really helps here.
7. Now you need to upload the entire folder into the “3Dmodels” folder on your phone. I like using AirDroid to transfer files, but you can use whatever works for you. The image below shows what the folders now look like on my phone.
8. On your phone, run “3d model viewer”, and put your phone into your Google Cardboard set.
9. To use the viewer, aim the crosshairs at the menu items, and let the crosshairs sit on the on-screen button for a second in order to select it. I like to turn off the backgrounds because I find them distracting. Then, move the crosshairs over the folder and then the file name to open the model. Sometimes the model can take a while to open.
10. When you are in the model, you can look at the feet to turn on walking, and you can look at them again to turn off walking. Or, you can use the magnet on the side of Google Cardboard to toggle walking on and off. In some places on the screen, you will see up and down arrows. Move the crosshairs over those to move your point-of-view up and down.
11. When you want to go to the menu, look down at your feet to see the “menu” button.
Videos for Comparison
I’ve created three videos so that you can see how a simple model I made looks in Sketchup and how it looks when run in the 3d model viewer program. I’ve also created a third video to show you what the “Diorama” mode looks like in the program. Keep in mind that even though the second and third videos show only 2D images, the model viewer does show your model in 3D when you look at it in Google Cardboard.
Have fun!
Recording of the Original Castle Model
3d model viewer on Android Phone
3d model viewer in Diorama Mode

Nice tutorial! Great to see something posted about Sketchup together with Google Cardboard. I have the app you used but I never used it because of all the stuff about obj files and textures. (I have the free version of sketchup). Best I have experienced so far is streaming the sketchup model from my PC’s desktop to my Cardboard using Trinus VR in fake 3D mode. I control the walking with the PC’s mouse in the conventional way though I envy your being able to activate the walk feature from your cardboard headset! I have also streamed in true 3D using the stereoscopic window in Sketchup’s camera menu (can’t recall if that was a plugin or not). The stereoscopic mode really makes a huge difference but the latency is a deal breaker because my PC doesn’t process the second window fast enough. Perhaps a higher powered PC would handle this easily. It will be nice if and when the day comes when Sketchup’s Android Viewer app is outfitted with all the trimmings for Google Cardboard so we can visit our model’s instantly without any workarounds! I guess that is pie in the sky but who knows? Maybe someday, eh?
I never knew about the stereoscopic view. It’s too bad about the latency, but it seems like it’d be worth it to check it out. I’ll have a look. Thanks.
Chris, Have you tried the new Kubity app which was released last month?
I haven’t heard of it, but I’ll check it out for sure. Thanks.
Pingback: Google Cardboard For Android: Educational Apps That I’m Exploring | Doors Marked Pull
Hi Chris,
Thanks for your user manual. Unfortunately, standard Sketchup does not have the OBJ export menu item. I searched the web and found a Sketchup Ruby program, that I adapted for OBJ2VR. It creates directly the good files in one single folder, reverses X axis,… I cannot attach it to this reply, but you can find it in “XDA developer” site together with te explanation copied below. In XDA, search for “walk in your own sketchup 3D model with google cardboard virtual reality”.
Regards,
Guillaume_
– Install Google Sketchup 2016 (or 2015) on your PC, it’s free on Google
– install OBJ2VR on your Android phone, it’s free on GooglePlay
– Copy the file “OBJexporter.rb” attached to this post in the folder “C:\Program Files\SketchUp\SketchUp 2016\Tools”
It is a simple text file with .rb extension, you can read the program in the .br file, it will create a new menu item in the File menu of Sketchup.
– Open Sketchup
– Suppress the character displayed in the Sketchup start model, otherwise it will be included in your exported model
– In Sketchup open the menu “Window / 3D warehouse”
– Choose a 3D model, not too heavy, not too complicated at first, and import it into your Sketchup workspace
– you can as well create your own 3D model
– Be careful to place your model at the axis origin, the best is to have the origin (0, 0, 0) inside your model, otherwise it may be difficult to find into obj2vr
– Save the Sketchup file in your preferred folder with a name not too long with no spaces
– In Sketchup select menu “File / OBJexport…” (just created by the .rb file), it will immediately create your OBJ model
– Wait for the end of all actions, you can follow the process in the status bar
– You will find a new folder within the folder of your Sketchup file, which contains .obj, .mtl (material) and textures files (if any)
– Copy this new folder in a folder named “3Dmodels” on the root of your SD card on your Android phone
– launch OBJ2VR
– put your VR helmet or cardboard with your phone inserted into it
– select or unselect the option “scaled” top left to switch between 2 ways of walking through your model
– navigate into the folders and select the .obj file you just created
– you’re in, aim the feet to walk, the arrows to go up and down, have fun
Hi Guillaume,
Thank you again. That will be helpful.
You need to try the Kubity app. It is way better handling the sketchup files as you won’t get missing geometry. I have used Kubity to get clients get a RAW view of the model then use INSITE VR for VRAY 360 renderings.
Thanks. I’m planning on trying out Kubity this week. I’ll either add my thoughts to this post or make a new post, depending on how it goes.
This is great! Just tried it and finally see my sketchup in 3d. it will be great if there is a way not to go thru walls.
Thank you. I’m glad you like it.